Goal:
Why should you try to make a nice comfortable kitchen when camping outdoors ?
>In order to cook in a practical way
>To respect a good hygiene and security measures that are compatible with the law.
Example : an aerial view of a fully equipped camp kitchen
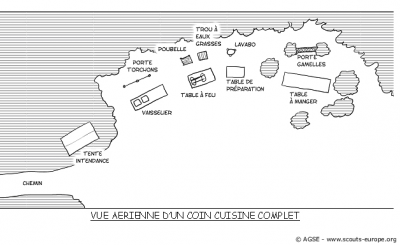
Be careful ! The elevated firepit should not be under the trees
A list of facilities:
!BE CAREFUL! You should make sure that what you have chosen to build will not be too difficult in comparison to the time you have, the quantity of wood and the space you can occupy.
i. The tent for food storage
>It will only be used for that purpose
>It is high enough for you to stand inside
>Prepare plastic storage boxes in order to store clean dixies.
>No food should be put directly on the floor : trunks, plastic boxes, crates have to be set above the ground on logs, bricks, pallets...
>All fresh products should be carried in a coolbox or a coolbag. They will be stored in a refrigerator or prepared within the 2 hours that follow.
>Do not strore cleaning products (whatever they are) and food together.
>Leftovers will be thrown away : bits of bread, milk, opened biscuits…
>However basic products such as flour, sugar and oil will be carefully stored in airtight boxes or food bags.
2° The elevated firepit
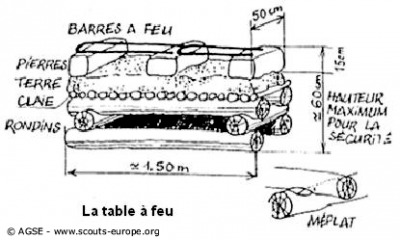
- 4 wooden poles 5’ tall and 3 to 6" in diameter
- 2 logs about 2’ tall and 3 to 6" in diameter
- Wood for a wicker rack (3 to 4" in diameter)
- Preferably some clayish mud
- A few stones
>The firepit will be 2’ above the ground
>If you choose to enlarge the table you will be able to put some billycans on the side as you cook.
>The firepit should be large enough to make 2 fires. You can build a counter next to it.
>Put a tincan with glycerin soap and a paintbrush : if you put soap on your billycans before you put them in the fire they will be easier to clean !
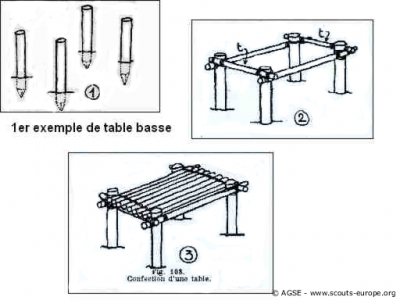
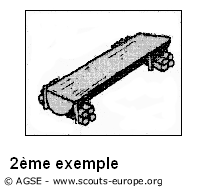
3° The counter
>At home, you never cook directly on the floor, while you are camping you should do the same : use a trunk or a table you built...
>You should always use a cutting board or a plastic tray (never use a wooden tray)
4° The sewage disposal
You will find here everything you need to know.
5° The waste bin
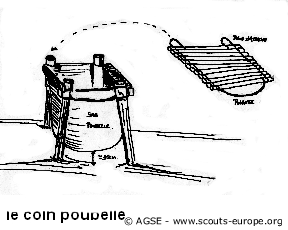
>They should be put away from the rest of your camp site
>The bags will be evacuated after each meal. Choose small plastic bags if you can.
>Sort cardboard and glass disposals
6° The handwasher
Click here to find ideas in order to build a washbasin
>According to basic hygiene rules you should wash your hands before cooking and before each meal.
7° The dish dryer

>It is made up of at least 2 basins (one for washing and one for rinsing)and a net or a wicker rack to let dixies dry.
>Each basin will have a precise use. You can choose a specific color for each basin. eg :
- a green basin to clean vegetables
- a blue basin to do the dishes
- a yellow or a white basin to wash your hands
>For billycans you can put everybody in a row and do your dishes as each scout passes in front of the washing basin. It will accelerate the process and won’t be as tedious. The scout who has to do the dishes that day can rinse the billycans, the owner then has to pick them up, dry and store them.
>Billycans will be stored in the scout’s bag (you can find examples of how to pack here). Each one is responsible for his/her things : You do not lay the table by simply picking up billycans from nowhere .
8° The dish cloth handler

>The dish clothes have to be put away every day. Take them out as you need them and put them away after use.
A few ideas on things you can build before you go camping :
- A transportable wicker rack
- A dish cloth handler
- Clothes peg
- Pot holders (find an example here)
- A net


